Cisco Firepower Management Center v6.2 - Reference Guide
Firepower Management Center v6.2 Reference Guide
While I have delivered Cisco Firepower to customers over the last several years, I always prefer that my customers are engaged and shadowing me as I install, configure, and tune Firepower. I am more than happy to explain as I go along however after Firepower is up and running I like to leave my customers with a reference guide that can help them better understand their new best of class NGIPS solution.
I would like to share with you an example of this reference guide and I hope that it helps you better understand some partcular features or functions within Firepower Management Center, in this case v6.2. Once we understand the underlying features and functions, we can better configure and thereby tune the NGIPS so we can achieve the highly touted efficacy of the product in terms of detecting and preventing threats!
Lets start at the beginning:
Initial Configuration Steps - Definitions and HowTo
Network Discovery Policy (Policies->Network Discovery)
The Default Policy is set to Collect Everything (Notice Only Applications is selected as well)
The effects of this default policy will tell Firepower to profile (attempt to anyway) and create a host profile for every IP and host it sees traverse the system, this also will include hosts from the Internet. As you are likely thinking at this point, this is not ideal and would be a waste of resources. As well as being a potential waste of resources, there is also a host limit on appliances (e.g. 50,000 for Virtual Firepower Management Center). We obviously do not want to reach our host limit because of webpages and hosts being profiled from the Internet.
A more streamlined approach would be to add an object that summarizes your internal/private IP address space (Check Hosts and Users so now all options are selected and discovered)

A more streamlined approach would be to add an object that summarizes your internal/private IP address space (Check Hosts and Users so now all options are selected and discovered)
Variable Set (Objects->Object Management)

The variable set represents a set of commonly used values to then later be utilized in Intrusion Rules to therefore identify source, destination IP addresses, and ports. The HOME_NET variable in the variable set is defined as the "protected" networks variable. This feature is modular in that you can create multiple variable sets, you could then potentially apply each variable set to specific policies. A quick example would be something like:
Internal_Variable_Set: Configure the HOME_NET under this variable set to define say the summarized IP address space for your internal network (e.g. 10.0.0.0/8)
DMZ_Variable_Set: Configure the HOME_NET under this variable set to define say the summarized IP address space for your DMZ network/s (e.g. 172.31.0.0/16)
You can now potentially create two separate Access Policies and therefor apply separate Intrusion Policy and Variable set. A quick example is shown below:


The following is a list of system pre-defined variables and their descriptions. Notice the variables where it is recommended we modify:

Access Policies (Policies->Access Control)
We have multiple access policy actions that we can take as we build our policies, they are defined as follows:

Inspection and Logging within Access Policies
As you build your access policies, there are a multitude of tabs available wherein we can better classify traffic, then choosing what we want to subject that subset of traffic to (e.g. URL Filtering).
The tabs are:
The tabs are:
Zones: These are initially created at Objects->Object Management->Zones (e.g. Inside, Outside, DMZ)
Networks: This is where you can enter subnet/s by IP Address or add objects and object groups (Created at Objects->Object Management->Network->Add Network)
VLAN Tags: We can classify and therefore take various actions based on the L2 dot1q tag
Users: We have the ability to register FPMC to MS-AD/LDAP server and then be able to take action based on AD Group/s.
Applications: Here we can take advantage of AVC (Application Visibility and Control), we can take granular action based on application (e.g. Allow Facebook, Block Facebook Chat)
Ports: This tab is pretty self explanatory, we can lock traffic flow/s down to specific ports etc.
URLs: Here we have category based URL Filtering, it is important to note that this functionality does NOT meet the requirements of a true HTTP caching utility (e.g. Proxy - WSA, Bluecoat, Forcepoint) and based on your companies requirements, you may be able to consolidate proxy services into Firepower while some customers have strict requirements and therefore will need to maintain their existing proxy service/s.
SGT/ISE Attributes: This delves into Cisco ISE and TrustSec. This allows Firepower to filter traffic based on Security Group Tags.
Inspection: Here we will set the appropriate Intrusion Policy, Variable Set, and File Policy for the access rule.
Logging: Typically if traffic is allowed, "Log at End of Connection" is ideal. For traffic that we Block we obviously only want to "Log at Beginning of Connection" as there will be no "End of Connection" on traffic we have blocked. There are other options such as where we want to send logs, we typically want to send connection events to "Event Viewer" (Analysis->Connections->Events) and if you have an external Syslog server in production and or SNMP server.
Comments: Some customers and or environments require a high level of trace-ability to access rule creation, this is where a Security Engineer will comment and or cross reference a help desk ticket wherein particular access had been requested.
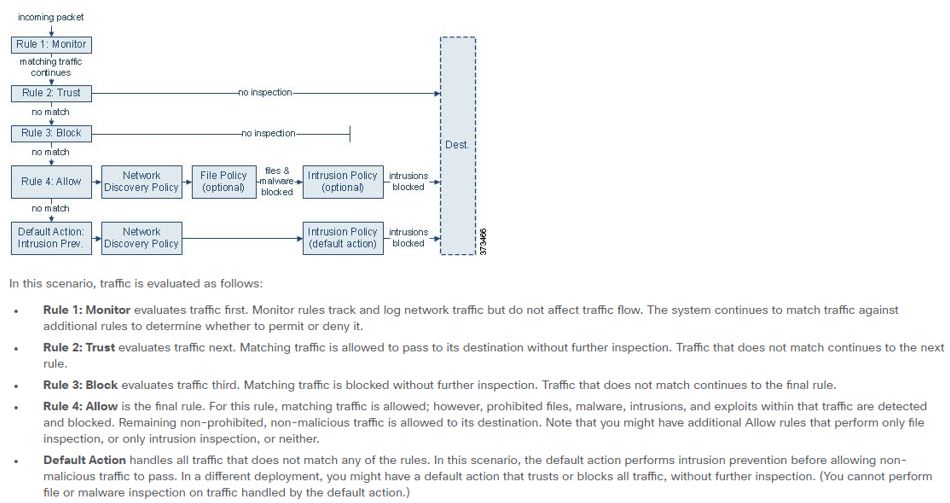
The following is an example of the traffic flow process:
Intrusion Policies (Policies->Intrusion)
Intrusion Policies consist of multiple layers. There is a Base Policy (e.g. Balanced Security and Connectivity, Security Over Connectivity) wherein these are the policies defined by the Cisco VRT (Vulnerability Research Team) team.
For those Security Engineers that experienced and or managed Legacy IPS it was difficult to first, gain visibility into the environment and in many occasions Engineers had no idea as to what traffic was traversing their network so they would simply turn on ALL signatures in hopes of catching any threats.
It is clear to see why that was NOT a sound approach to Intrusion Detection/Prevention. Turning on ALL signatures would severely tax the IPS hardware and in many cases completely make it unreachable. With Firepower we now have a very nice feature to better help us tune Firepower to our specific environment/s.
Firepower Recommendations
The power in this feature lies in the fact that Firepower is essentially a data mining tool. It is actively learning as traffic traverses the sensor (Firewall, Appliance). Firepower can then make recommendations in regards to particular signatures that should be enabled and or disabled based on what variables it has seen (e.g. OS, Apps, Ports etc.) in our environment/s. While this may not be a "silver bullet" it certainly goes a long way in making our job easier and allows us to get started with confidence.
Firepower Recommendations can be scheduled (System->Tools->Scheduling)
You will see a calendar, click “Add Task” and select Job Type as Firepower Recommended Rules. If you have multiple Intrusion Policies you can choose to update recommendations within all policies or pick and choose separately as needed.

Lets get back to Intrusion Policies, there are a few best practices I have discovered over the years to go on top of the above mentioned layers (Base, Firepower Recommendations). Click on "Rules" under the Intrusion Policy, we can enable a few extra signatures based on the following keywords we can filter on:
- Blacklist
- PUA (Potentially Unwanted Applications)
- Indicator of Compromise
- Exploit Kit
- 1201 (INDICATOR-COMPROMISE 403 Forbidden)
An example of filtering on say "blacklist", we will see various rules attributed to this keyword

Note: Firepower Recommendations may very well turn on some of these rules based on what it has seen in your environment. Again, Intrusion Policies are hierarchical and policies replicate downward, as an example
Under "Policy Layers" you will see the hierarchy:
My Changes
Firepower Recommendations
Balanced Security and Connectivity (Base Policy)
If you disable a rule in "My Changes", had it been enabled say under Firepower Recommendations, it will now be disabled there as well.

SSL Decryption
Please see my blog post on this subject. SSL Decryption is a fancy feature and it has caught the attention of many Engineers. However, it is very important that the Security Engineering team discuss the pros/cons and or caveats with the business BEFORE implementing this feature.
You can view my SSL Decryption blog and implementation articles HERE!!!
Active Directory Integration
You may want to integrate FPMC into Active Directory and
there are multiple functions we gain from doing so:
- Login to FPMC with Active Directory credentials, RBAC (Role Based Access Control) via User Roles based on AD Group Membership
- User Identification to be us utilized in Access Policies (e.g. Executive Internet is not subjected to URL Filtering, Domain Users will be subjected to Corporate Internet AUP)
Here are a few screenshots stepping you through the basics of FPMC AD integration:
System->Users->External Authentication->Add External Authentication Object
 You can test connectivity with an AD user account as shown under “Additional Test Parameters”.
Group Controlled Access Roles – You can leverage AD group membership to define what User Role is assigned upon login.
Go to System->Users->User Roles
Here we can create new user roles. You can select an existing role, copy it and then edit it to meet your needs. I typically start with two (2) new roles (These will correspond to AD groups with the exact same name/s):

Now, back to the External Authentication Object. Lets configure RBAC so under "Group Controlled Access Roles (Optional): Fill in the DN for each AD group as shown:

Now, should a user attempt to login and be authenticated yet they are NOT a member of either the FPMC_ADMINS or FPMC_NOC the default role as highlighted above will be "Security Analyst (Read Only)" and you can change this per your requirement/s.
Security Intelligence
Policies->Access Control->Security Intelligence Tab
SI is a very important topic to be covered. SI is where we can configure policy based on IP, URL, and DNS feeds provided by the Cisco Talos Security Intelligence, Vulnerability Research Team, and/or our own custom lists and feeds we create.
As this is provided by the Cisco teams mentioned above, it is recommended you take advantage of this and add the applicable objects to the Blacklist column. A default SI posture looks as follows:
 Let's add the various nefarious Objects and URLs to the Blacklist

Anything on these lists can be blocked prior to access control rules so the malicious traffic can be blocked without further inspection or wasting resources if it's communicating or destined to a known bad actor destination.
Example: Adding an URL or Domain to Global Whitelist or Blacklist
 Right Click the URL - You will see several options as shown below:

You can verify your option by going to Objects->Object Management->Security Intelligence->URL List and Feeds. You will now see the URL added to the Global Blacklist (Had you selected "Blacklist HTTP/S Connections to URL"
 You can also perform the Blacklist/Whitelist Now feature on destination IP Addresses

Note: This URL will now be blocked BEFORE inspection of access policies
Tech Tip: If the SI event is not working, clear the conn table or xlate table
System->Users->External Authentication->Add External Authentication Object

Group Controlled Access Roles – You can leverage AD group membership to define what User Role is assigned upon login.
Go to System->Users->User Roles
Here we can create new user roles. You can select an existing role, copy it and then edit it to meet your needs. I typically start with two (2) new roles (These will correspond to AD groups with the exact same name/s):
- FPMC_ADMINS
- FPMC_NOC

Now, back to the External Authentication Object. Lets configure RBAC so under "Group Controlled Access Roles (Optional): Fill in the DN for each AD group as shown:

Now, should a user attempt to login and be authenticated yet they are NOT a member of either the FPMC_ADMINS or FPMC_NOC the default role as highlighted above will be "Security Analyst (Read Only)" and you can change this per your requirement/s.
Security Intelligence
Policies->Access Control->Security Intelligence Tab
SI is a very important topic to be covered. SI is where we can configure policy based on IP, URL, and DNS feeds provided by the Cisco Talos Security Intelligence, Vulnerability Research Team, and/or our own custom lists and feeds we create.
As this is provided by the Cisco teams mentioned above, it is recommended you take advantage of this and add the applicable objects to the Blacklist column. A default SI posture looks as follows:


Anything on these lists can be blocked prior to access control rules so the malicious traffic can be blocked without further inspection or wasting resources if it's communicating or destined to a known bad actor destination.
Example: Adding an URL or Domain to Global Whitelist or Blacklist

You can verify your option by going to Objects->Object Management->Security Intelligence->URL List and Feeds. You will now see the URL added to the Global Blacklist (Had you selected "Blacklist HTTP/S Connections to URL"


Note: This URL will now be blocked BEFORE inspection of access policies
Options to reduce False Positives (Trust or Allow, Disable Rules, Threshold & Suppression Options)
HERE is a link to some options to reduce false positives within FPMC
HERE is a link to some options to reduce false positives within FPMC
DNS Sinkhole Configuration
Objects->Object Management->Sinkhole
You will then create Sinkholes for CnC, Malware, and Phishing Sinkholes. A non-routable IP Address will be used (sinkhole):
 Let's now tie this Sinkhole configuration to a DNS Policy
Policies->DNS
Create a new DNS rule for each of the previously (three) created Sinkholes. The example below is configured for the CnC Sinkhole:


Connection Event Reason Descriptions

Firepower is an extremely robust tool and we have honestly just scratched the surface here but I hope that you now have a better understanding of the various features and configuration options available. This guide should get you up and running and put you on the right track to gaining visibility into your environment so you can therefore better secure and protect your investments and information.
Keep the traffic flowing...and secure.....!
Until next time...cheers!
Objects->Object Management->Sinkhole
You will then create Sinkholes for CnC, Malware, and Phishing Sinkholes. A non-routable IP Address will be used (sinkhole):

Policies->DNS
Create a new DNS rule for each of the previously (three) created Sinkholes. The example below is configured for the CnC Sinkhole:


Connection Event Reason Descriptions

Firepower is an extremely robust tool and we have honestly just scratched the surface here but I hope that you now have a better understanding of the various features and configuration options available. This guide should get you up and running and put you on the right track to gaining visibility into your environment so you can therefore better secure and protect your investments and information.
Keep the traffic flowing...and secure.....!
Until next time...cheers!


Comments
Post a Comment